What Size Styrofoam Balls Are Needed for Planets?
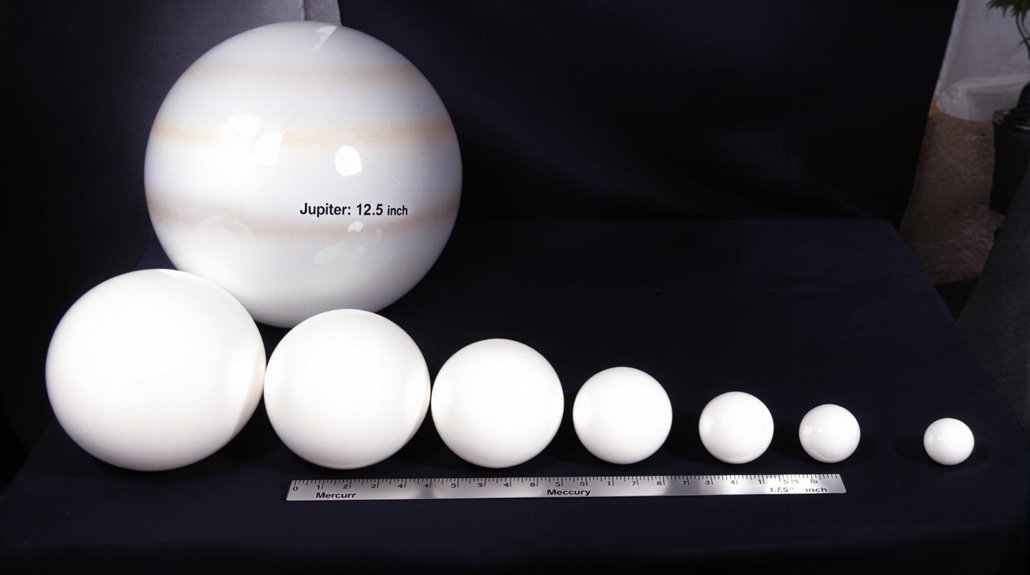
For a solar system model, you'll need styrofoam balls in various sizes to maintain proper scale. Start with a 5-inch ball for the Sun, use 1.25-inch balls for Mercury and Mars, 1.5-inch balls for Venus and Earth, a 4-inch ball for Jupiter, 3-inch for Saturn (plus a 5x5-inch ring), 2-inch for Uranus, and 2.5-inch for Neptune. These dimensions will help you create an accurate representation of our cosmic neighborhood, with plenty of creative options for bringing each planet to life.
Essential Supplies and Materials List
Building a solar system model requires several essential materials to create an accurate and visually appealing representation. You'll need a complete set of Styrofoam balls ranging from 5 inches down to 1.25 inches, which form the foundation of your solar system kit. Wooden dowel rods or skewers are pivotal for supporting each planet, while craft paints in specific colors will bring your celestial bodies to life.
For assembly, you'll want string or fishing line to suspend the planets, plus an X-acto knife and scissors for crafting Saturn's rings from Styrofoam sheets. Don't forget the glue to secure everything in place. Whether you're working on a school project or personal display, these materials will help you construct a detailed model that showcases the relative sizes of our solar system's planets. The 6-inch Styrofoam ball represents the sun and serves as the centerpiece of your solar system model.
Planet Size Requirements and Ratios
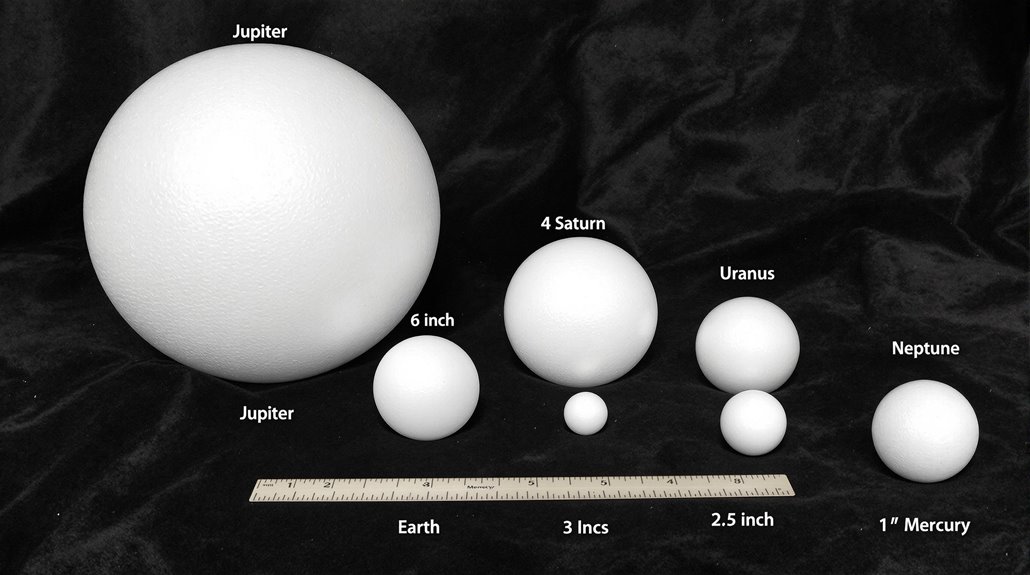
Accurate scaling of planet sizes brings your solar system model to life. You'll need foam balls in the following sizes from your local craft store: Start with a 5-inch ball for the Sun, then use 1.25-inch balls for Mercury and Mars, 1.5-inch balls for Venus and Earth, 4 inches for Jupiter, 3 inches for Saturn, 2 inches for Uranus, and 2.5 inches for Neptune.
For Saturn's rings, you'll need a 5x5-inch styrofoam ring that's 0.5 inches thick. These proportions will make your science fair project look more realistic and professionally crafted.
Don't forget to get a 10-inch ball to cut in half - this creates the perfect dome for mounting your planets in an eye-catching display. Make sure to let your acrylic paint applications dry completely before assembling your solar system model.
Choosing the Right Ball Dimensions
To create a realistic solar system model, you'll need styrofoam balls in specific dimensions that maintain proper scale relationships. For this project, you'll start with a 4-1/2 inch ball to represent the sun, which is the largest component in your solar system kit.
The inner planets require smaller balls: use 1-1/4 inch balls for Mercury, 1-1/2 inch balls for Venus, and gradually increase sizes for the outer planets. Mars needs a 2-inch ball, while the Great gas giants Jupiter and Saturn call for 3-inch and 3-1/2 inch balls respectively. Neptune rounds out your model with a 2-1/2 inch ball. These proportions help you visualize the dramatic size differences between celestial bodies, making your solar system project both educational and visually accurate. Remember to apply acrylic paint only since spray paints will dissolve and distort the foam material.
Painting and Decorating Guidelines
Once you've gathered your styrofoam balls, you'll need acrylic paints and brushes to bring your solar system to life. Start your solar system project by painting the largest 5-inch ball bright yellow to create the sun. For Mercury, paint the 1.25-inch ball orange, and make Venus stand out with a blue-green color on the 1.5-inch ball.
Jupiter's 4-inch ball requires more detail - paint it orange with red and white stripes, and don't forget to add its famous Great Red Spot. To make Saturn's distinctive appearance, paint the 3-inch ball yellow and its styrofoam ring orange. Making a solar system can be much fun as you watch each planet take shape. Remember to let each layer dry completely before adding details or handling the balls.
Assembly and Construction Methods
After your planets are painted and dried, proper assembly will bring your solar system model to life. We highly recommend using paper cups as support stands during construction - place larger balls on the cup rims while mounting smaller ones on wooden dowels stuck through inverted cups. This kit was perfect for science projects, as it includes nine 12-inch wood rods and an eyelet screw for hanging your completed model.
For visual appeal, paint the rings with contrasting colors like red and white stripes, dark blue, or light blue before attaching them to your model. The kit provides two 4-3/4 inch printed rings, one 4-1/2 inch styrofoam ring, and a 3-inch base ring. Position each planet securely on its rod, ensuring proper spacing between celestial bodies for an accurate representation.
Tips for Proper Scale and Proportion
Proper scaling is essential for creating a realistic solar system model that accurately represents the size relationships between celestial bodies. When you're learning about the solar system, using the correct sizes of Styrofoam balls helps you visualize the dramatic differences between planets.
Start with the 10-inch ball for the Sun, then position your planets from largest to smallest: the 5-inch for Jupiter, 4-inch for Saturn, 3-inch for Uranus, 2.5-inch for Neptune, 2-inch for Earth, and the smaller 1.5-inch and 1.25-inch balls for Mercury and Venus. To enhance your Model of the Solar System, add the Great Red Patch on Jupiter by marking the correct area with red paint. Secure each planet at the end of the dowel, making sure to see more product details for proper spacing measurements.